Setup
Prerequisite
In order to setup and configrue Big picture, a zip file with the name omniax_bigpicture.zip is required.
Install and Setup Big Picture
- Register the extensionId. This is done by first registering the extensionId which can be found inside the zip file, under extension.json.
- Go back to System > Extensions, and Upload the omniaX.bigpicture.zip file.
- Once the file has been uploaded, navigate to Features and activate the tentant scoped feature called OmniaX Big Picture Core and activate it.
Setup Big Picture
Now that big picture is sucessfully installed, we will set it up in a page of its own.
- Go to the start page of the intranet site that you wish to use big picture on.
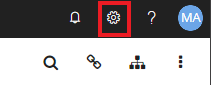
- Click on the cogwheel in the upper left corner
- Click on Manage Content.
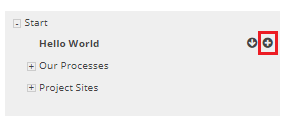
- Click on the plus button of your main page, in this example the start page of the entranet is called hello world:
- Make sure that create page is selected, and write Big Picture in the Title section.
- Click publish.
- Click on the Big Picture site in the menu.
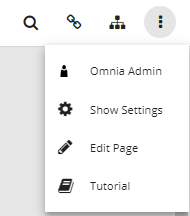
- Click on the three dotted button, then click on edit page button in the upper left corner.
- Click on the headings button (the middle button).
- Scroll down to OmniaX and drag and drop the Fullscreen Viewer component on the top left Web part.
- Click on the cogwheel to configure the web part and then click on save then publish when finished.
The manual for features and configuration functions can be found here.