Setup Publishing Site
Follow these steps to setup a publishing portal with basic Omnia features activated.
- Go to SharePoint admin center.
- Create a new site collection based on the Publishing Portal template.

- Go to the start page of the newly created site collection.
- Go to Omnia Admin > Features.
- Makes sure that the following tenant scoped features are activated:
- Omnia Glue Core
- Omnia Intranet Core
- Omnia Intranet Content Management Core
- Omnia Intranet Navigation Core
- Omnia Intranet Social Core
- Omnia Statistics Provider Core
- Navigate to Omnia Profiles and add a new profile for the intranet.
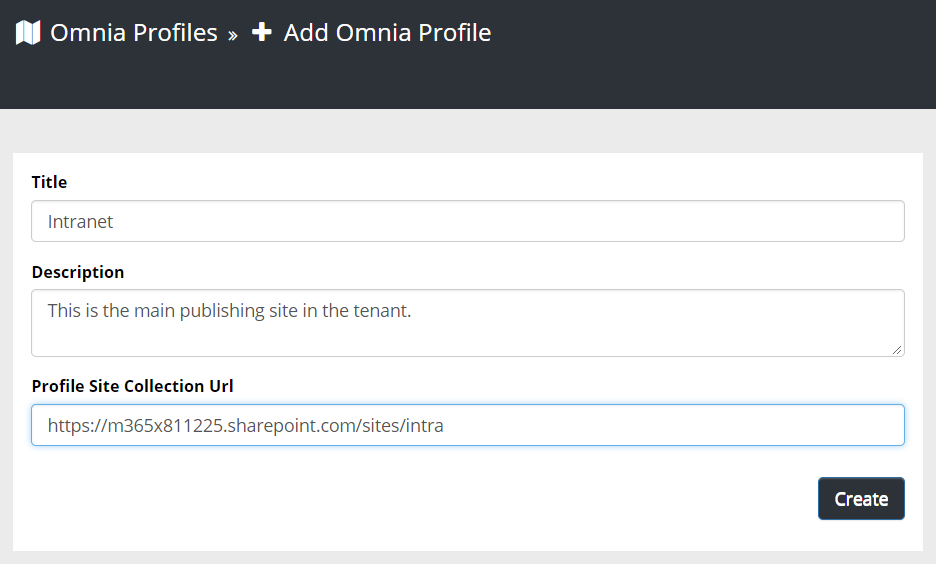
- Click on Default Mapping and select “Intranet” and click save.
- Navigate to Features.
- Activate the following Site Collection scoped features:
- Omnia Core Master Page
- Omnia Core Image Renditions
- Omnia Intranet Content Management
- Omnia Intranet Content Types
- Omnia Intranet Page Layouts
- Omnia Start Page Layout
- Omnia Intranet Web Statistics
- Activate the following Site scoped feature “Omnia Glue Site”.
- Go back to the start page and Site Settings > Master pages and page layouts.
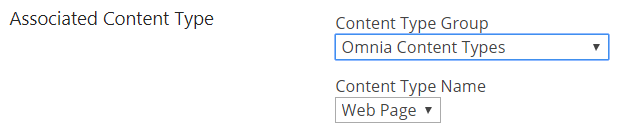
- Find OmniaStartPage.aspx, edit properties and change the Associated Content Type to Web Page.
- Publish a new major version of the page layout OmniaStartPage.aspx.
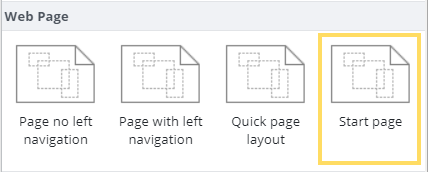
- Go back to the start page and change the page layout to “Start page”.
- Delete all out of the box web parts from the page and publish it.
- Go to “Site Settings” > “Page layouts and site templates”.
- Limit the available page layouts according to the below.
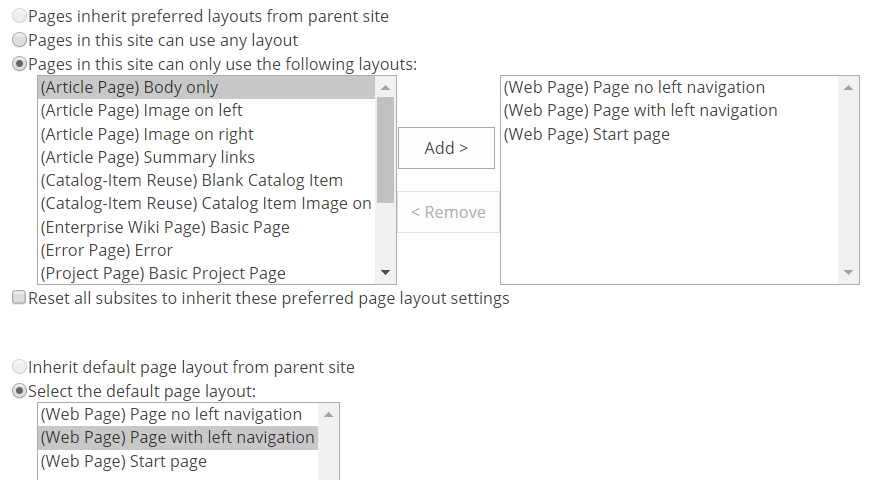
- Go back into “Page layouts and site templates”, select “Page with left navigation” as default page layout, and click on OK.
Follow these steps to setup quick pages in the publishing portal.
- Go to Omnia Admin > Content Management.
- Click on Enable Quick Pages.
- Select “Yes” and click save.
- Go to the start page and temporarily change the SharePoint page layout to “Page no left navigation”.
- Open Manage Content and click on the Start node.
- Uncheck “Enable legacy web parts” and save the page.
- Go to the start page again, switch the SharePoint page layout back to “Start page”, and publish the page.
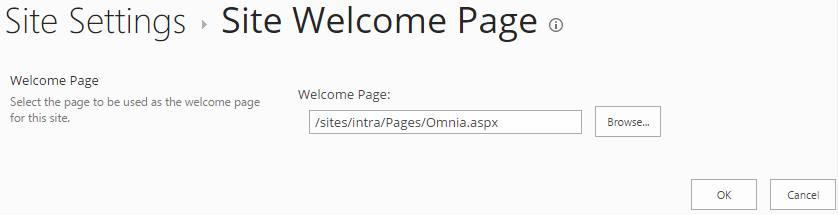
- Go to Site Settings > Welcome Page.
- Change the welcome page so that it points to Omnia.aspx that is located in the root pages library.
(Note! It may take some time for the SharePoint cache to release the old welcome page. Now is a good time to get a coffee before you continue.)
Follow these steps to setup basic page properties in the publishing site.
- Go to the start page of the main publishing site.
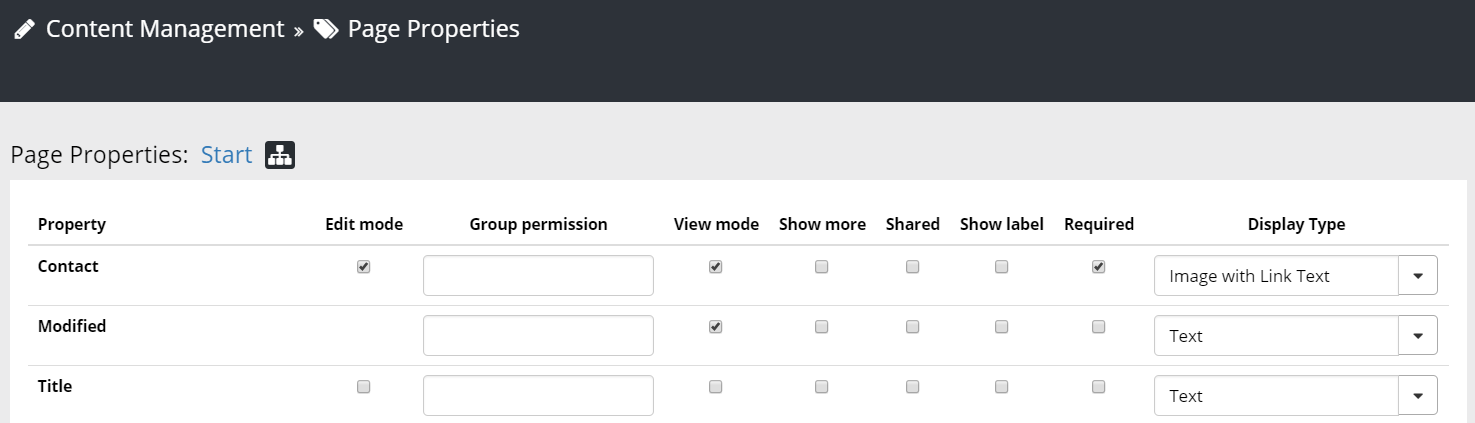
- Go to Omnia Admin > Content Management > Page Properties.
- Add the page properties that you would like to show on web pages in the publishing site.
Follow these steps to set up review and content management reports.
- Go to the start page of the main publishing site.
- Go to the Site Settings > Site Columns.
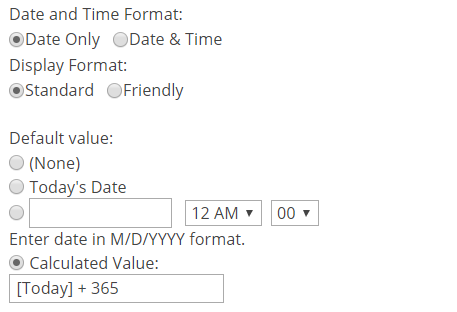
- Edit the Review Date:
- Change to Date and Time Format to “Date Only”.
- Set the Default value to “[Today] + 365”.
- Go to Omnia Admin > Content Management > Page Properties.
- Check the box to show the property Review Date in Edit mode and save.
- Go back to the start page of the main publishing site.
- Open Manage Content and create and publish a new page.
- Now it is a good time to grab a coffee, because the search engine needs to crawl this page.
- Go to SharePoint Admin Center > Search > Manage Search Schema.
- Map the managed property RefinableDate05 to ows_q_DATE_OMIReviewDate.
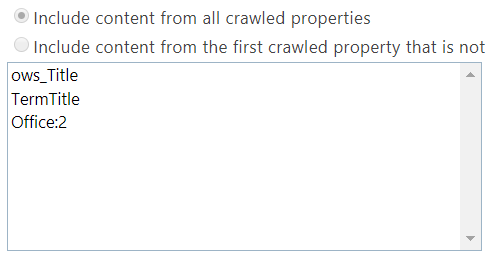
- Map the managed property RefinableString50 to ows_Title, TermTitle and (Category:Office)2.
- Go back to the main publishing portal.
- Go to Site contents > Pages library settings > Advanced settings.
- Click on “Reindex Document Library” and click OK.
- Go to Omnia Admin > Content Management > Web Report Settings.
- Set “Managed Property For Review Date” to RefinableDate05.
- Set “Managed Property For Title” to RefinableString50.